In an ever-evolving landscape of industrial and residential power needs, the demand for a consistent and reliable three-phase power supply remains steadfast. Whether you’re a manufacturer seeking to optimize machinery performance or a hobbyist looking to power heavy-duty equipment in your workshop, understanding the mechanics of rotary phase converters is a valuable skill. This guide delves into the intricacies of these devices, providing a step-by-step walkthrough that demystifies the wiring process. From the fundamental principles of phase conversion to the practical nuances of wiring, we’ll equip you with the knowledge to harness the potential of rotary phase converters effectively. Join us as we explore the underpinnings of electrical transformation and empower you to unlock a seamless and cost-effective solution to your three-phase power needs.
Instructions for Setting Up Your Rotary Phase Converter: A Comprehensive Guide
Step 1: Ensure Power Safety
Always prioritize safety. Before proceeding with any electrical installation or adjustment, ensure that the power to the circuit is completely turned off. This prevents any unwanted electrical surges or potential accidents.
Step 2: Verification of Power Disconnection
Once the power is turned off, verify its disconnection. Using a multimeter is highly recommended for this step. This tool will help determine if any residual electricity is still present in the circuit. Never assume that the power is off without this crucial verification step, as it ensures user safety.
Step 3: Integrate Suitable Breakers and Wire Gauge
Depending on the specific requirements of your Rotary Phase Converter, install the appropriate double pole 220 VAC breakers. Always refer to the instruction manual that comes with your converter for precise details regarding the size of the breakers. Similarly, the wire gauge size is crucial. Typically, the company from which the motor was purchased should provide these specific details. If in doubt, always consult with a professional or the product manufacturer.
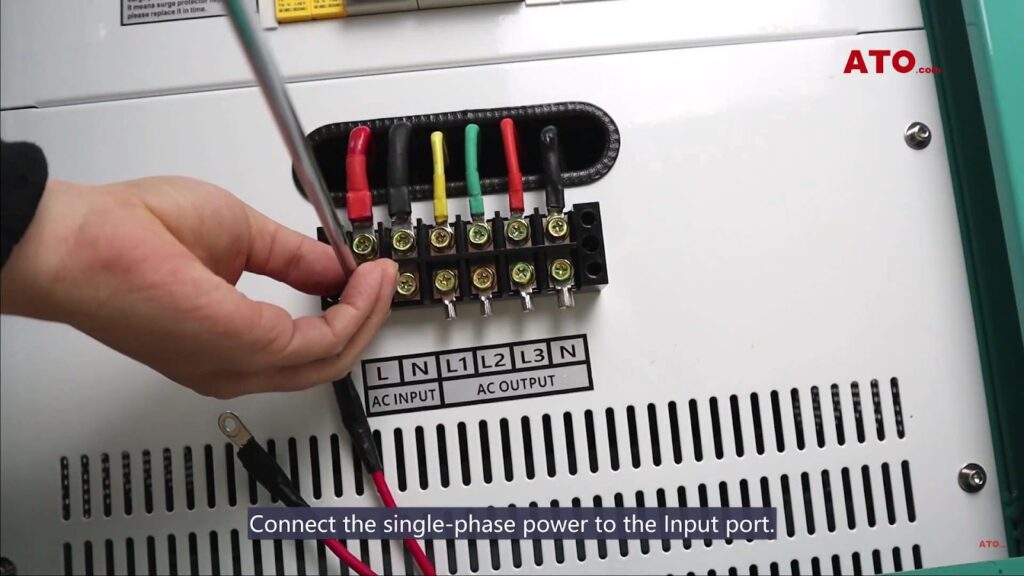
Step 4: Establishing the Single-Phase Power Connection
Locate the terminals labeled L1 and L2 on your Rotary Phase Converter. These are the points of connection for single-phase power. The connection should be established through the main disconnect switch. Additionally, there are several wiring diagrams available that can offer alternative ideas and insights for your wiring needs. It’s essential to follow these diagrams accurately to ensure the efficient and safe operation of the converter.
Note: It’s always recommended to seek guidance from an electrician or a professional if uncertain about any step. Proper installation ensures the longevity of the device and safety for all involved.
Exploring Three-Phase Converter Testing Techniques
When delving into the realm of three-phase converters, there are various methods to initiate your idler motor’s rotation and generate the elusive third leg of power. One approach involves the utilization of a “pony” motor coupled through a belt-drive arrangement. Alternatively, the idler motor can be kickstarted electrically with a start capacitor, or even set into motion manually by a gentle tug on its shaft. Regardless of the method employed, the paramount outcome is the generation of the third power phase essential for your machinery’s operation.
Primarily, when employing a start capacitor to initiate the idler motor, it becomes imperative to disengage the capacitor from the circuit once the motor-generator attains its operational momentum. To further refine the system’s efficiency, run capacitors can be integrated to balance the voltage disparities among the three power phases. For systems of larger magnitude, the inclusion of additional run capacitors in parallel becomes a viable strategy, providing enhanced stability and performance. Similarly, start capacitors can also be wired in parallel to accommodate more substantial units.
Mastering the Installation of Rotary Phase Converters
Embarking on the installation journey of rotary phase converters entails a thorough understanding of the process. Various manufacturers offer nuanced guidelines, and for instance, let’s delve into the installation protocol provided by North America Phase Converter Co. (NAPCco), which also includes a helpful instructional video.
It’s imperative to emphasize the importance of consulting and adhering to local electrical codes prior to initiation. Ensuring power disconnection before any installation work is not just recommended but obligatory for safety.
- Step 1. Commence by opening the enclosure and carefully removing the backplate to gain access to the internals;
- Step 2. With precision, mount the enclosure in a suitable location, considering factors such as accessibility, ventilation, and potential interference;
- Step 3. Navigate the intricacies of attaching fittings with connectors, ensuring that any necessary knockouts are removed to accommodate the conduits;
- Step 4. Determining the appropriate wire size is a pivotal step. Refer to the provided chart that outlines the correlation between wire size and the expected load;
- Step 5. Establish the connection of incoming single-phase power to the designated L1 and L2 terminals, fostering the initiation of the conversion process;
- Step 6. Within the power distribution block, there exist two distinct sets of output terminals. The initial set caters to the idler generator, while the subsequent set caters to the load. These terminals, identified as T1, T2, and T3, bear paramount significance. Following the diagram’s guidance, the idler motor should find its connection in the first set of terminals. Following this, the load should be meticulously linked to the second set of output terminals, culminating in a synchronized and harmonious power distribution;
- Step 7. In the pursuit of ensuring a secure and stable operation, grounding the equipment emerges as the final and crucial step. By grounding, the risk of electrical malfunctions or safety hazards is significantly mitigated, solidifying the system’s reliability.
Comprehensive Guide to DIY Rotary Phase Converters
Introduction to Rotary Phase Converters
Rotary Phase Converters (RPC) are popular in various industries due to their ability to convert single-phase power into three-phase power, enabling the operation of three-phase equipment in locations where only single-phase power is available. Their popularity often stems from their flexibility. In numerous scenarios, the equipment in question doesn’t mandate the use of high-quality power. However, when considering building one from scratch, it’s essential to weigh the pros and cons to ensure safety and functionality.
The Allure of the DIY Approach
Constructing a rotary phase converter might seem like a viable option for many because of the wealth of resources available to guide the process. The main draw is often the perceived simplicity of the DIY approach combined with the potential cost savings. However, it’s crucial to recognize that while the construction process may be straightforward, achieving the right balance with run capacitors can pose challenges.
Navigating the Capacitor Maze
One of the pivotal steps in building an efficient RPC is ensuring that it’s balanced correctly with run capacitors. This balance is crucial for the optimal performance and longevity of the converter. The core challenge arises when determining the appropriate size of the capacitors. This selection process is further complicated by the variety of wiring setups available, some of which might not be immediately successful. Ensuring a well-balanced system often requires multiple trials and adjustments, demanding patience and technical acumen.
Safety First: Considering Commercially Manufactured Converters
For those unsure of the potential rough power produced by a homemade unit and its impact on their equipment, it might be prudent to consider commercial alternatives. Established manufacturers produce UL-listed Rotary Phase Converters that adhere to rigorous safety and performance standards. Investing in a commercial-grade converter from a recognized brand can offer peace of mind, ensuring that the equipment remains protected and operates efficiently.
Conclusion
In conclusion, mastering the art of wiring a rotary phase converter is a valuable skill for those seeking to power three-phase machinery and equipment from a single-phase power source. Throughout this article, we have explored the fundamental principles of rotary phase converters, delving into the intricacies of their wiring process. By following the step-by-step guide provided, both beginners and experienced electricians can confidently navigate the complexities of connecting components, selecting appropriate wire gauges, and ensuring safety measures are upheld.