When it comes to setting up a 30 amp RV plug, the process is quite straightforward and manageable. Ensuring success requires testing the outlet prior to connecting any devices. The necessary components include a 30 amp RV outlet (NEMA: TT-30R), 10 gauge wire, a weather-resistant electrical box, and a new breaker.
Bringing Convenience Home with an RV Outlet
Establishing an RV outlet at one’s residence proves advantageous for owners of recreational vehicles or campers. The outlet serves various purposes, such as prepping for trips, maintenance tasks, and battery recharging. Furthermore, it offers the chance to extend hospitality to fellow RV enthusiasts, providing a platform for enjoyable gatherings.
The Power of Connection: RV and the 30-Amp Receptacle
Once the RV is connected to the 30-amp receptacle, it operates as a single high-power appliance. The 30-amp circuit breaker plays a crucial role in safeguarding the setup from drawing excessive power. This simplified approach only involves plugging in a single cord to activate all appliances.
Factors to Consider: Weather and Location
Deliberating the installation of the RV outlet raises the question of optimal placement. Given the RV’s outdoor positioning and exposure to potential challenges, selecting a location with minimal vulnerability is vital. Choosing a solid structure like a timber or stud wall proves ideal. The outlet should be housed within a deep-lid weatherproof box and positioned at least 24 inches above ground level.
Navigating the Installation Process
Before embarking on any electrical work, ensuring the absence of power is of paramount importance. After deactivating the breaker’s main switch, a multimeter or voltmeter should be employed to confirm the absence of electricity. While multimeters vary in price, prioritizing reputable brands like Fluke and Klein Tools, as well as obtaining a UL-listed unit, is advisable. The user-friendly approach involves learning through visual aids, with caution emphasized due to the potential dangers of working with electricity. If uncertain about personal skills, enlisting professional help is a prudent choice.
Diverse Outlets for Various Needs
The chosen 30-amp receptacle, namely NEMA TT-30R, is typically labeled “Travel Trailer Use Only.” This outlet provides a power output of approximately 3,600 watts (120 volts x 30 amps). Its corresponding plug, NEMA TT-30P, complements this configuration. The visual distinction lies in the outlet’s “U-shaped ground” design, which differs significantly from the unsuitable “L-shaped neutral” 240-volt OLD dryer receptacle that could potentially damage RV appliances.
Safety and Adequate Wiring
Undertaking the wiring process for a 30 amp RV receptacle demands mindfulness of safety risks. The use of appropriate wire size is crucial for successful operation. Utilizing at least a 10-gauge wire (or even an 8-gauge wire for added security) is recommended for connecting to a 30-amp, 120V service at home. Employing smaller wires leads to higher resistance, potentially reducing power efficiency. When considering distances less than 100 feet, a 10-gauge wire is acceptable, provided total load remains under 20 amps, and simultaneous appliance usage is monitored.
Understanding Voltage Drop
Voltage drop, calculated based on wire resistance, distance, amperage, and circular mills, necessitates a heavier gauge wire for extended runs. Optimal wire choices for a 30-amp circuit are as follows:
- Up to 25 feet: 10-gauge wire
- 25-50 feet: 8-gauge wire
- 50-100 feet: 6-gauge wire
- More than 100 feet: 4-gauge wire
Reducing voltage drop is essential for preserving consistent power flow, particularly crucial for appliances like air conditioners. The latter’s initial startup current of 50-60 amps underscores the significance of maintaining adequate voltage levels to prevent damage.
Adjusting for Temperature Variations
Considering the temperature conditions in which the wiring will be placed, adjustments become necessary. Higher temperatures require more significant corrections due to their impact on the wire’s current-carrying capacity. Conversely, lower temperatures necessitate milder adjustments.
Setting Up Your 30-Amp RV Outlet
To establish the 30-amp RV outlet, several steps are essential. A single 30 amp breaker is required for the receptacle. From the breaker panel, three wires extend to connect to the circuit breaker:
- Black wire (HOT);
- White wire (NEUTRAL);
- Green or bare wire (GROUND).
Color-coded terminals on the outlet are vital for proper connection:
- Green screw: Green or Bare wire (ground);
- Silver screw: White wire (neutral);
- Brass screw: Black wire (HOT).
Here’s a breakdown of the wiring process:
Step 1: Preparation
The journey to a well-functioning 30-amp RV plug begins with gathering essential tools and materials. These include a NEMA TT-30R 30-amp outlet receptacle, robust 10-gauge wires, a weather-resistant enclosure, and a set of reliable wiring tools. This initial step underscores the significance of proper planning and ensuring you have everything needed for a successful installation.
Step 2: Safety Precaution
Prior to delving into any electrical work, safety takes the spotlight. Begin by switching OFF the power supply at the MAIN breaker. An additional safety measure involves leaving a conspicuous note for others to avoid inadvertently reactivating the power. This precautionary step not only safeguards against accidents but also reflects responsible consideration for others sharing the space.
Step 3: Breaker Slot
To accommodate the necessary breaker, assess the panel box for an available slot. Should no suitable spot be available, contemplate integrating an extension panel dedicated to the 30-amp RV breaker. However, for intricate tasks like this, enlisting the expertise of an electrician is a wise choice to ensure proper installation.
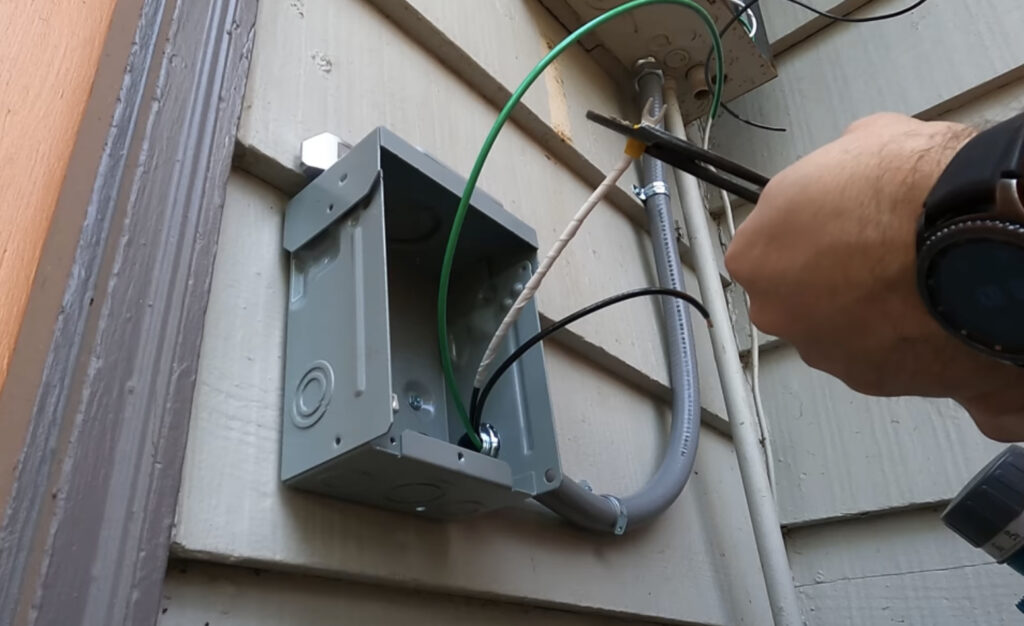
Step 4: Wiring
The process advances by threading the wires through the designated conduit and connecting them to their respective positions on either side. This meticulous wiring phase lays the foundation for a reliable and functional RV outlet.
Step 5: Outlet Connection
Connecting the outlet demands precision. Attach the black (hot) wire to the designated black terminal, the white (neutral) wire to the corresponding white terminal, and securely fasten the green or bare wire to the ground terminal. Attention to detail during this stage ensures a safe and effective power supply.
Step 6: Breaker Connection
Continuing the wiring journey, the black (hot) wire is connected to the breaker. This strategic connection contributes to the seamless flow of electricity within the circuit.
Step 7: Bus-Bar Connection
Inside the breaker panel, establishing connections to the bus-bars is vital. The green (ground) wire is appropriately linked to the green bus-bar, while the white wire finds its place within the neutral bus-bar. These connections constitute the heart of the circuit’s functionality.
Step 8: Power Activation
As the final connection comes to life, the main breaker is turned ON. For an added layer of assurance, employing a multimeter to verify the outlet’s proper functionality before active use is highly recommended. This thorough approach exemplifies the commitment to safety and meticulous craftsmanship at every stage of the process.
Testing the 30-Amp Outlet
Before embarking on plugging in devices, a prudent step is to conduct thorough testing of the outlet. This precautionary measure not only safeguards valuable appliances but also prevents potential hazards that can arise from faulty connections.
A highly recommended tool in this testing process is the popular surge protector by Camco, readily available on Amazon. This surge protector not only verifies the correct polarity of the outlet but also offers an added layer of defense against sudden electrical surges. Its dual functionality ensures that the power source is not only properly configured but also equipped to handle unforeseen fluctuations, providing peace of mind during use.
An Old Favorite: The Multimeter Method
For those inclined towards a more hands-on approach, a trusty multimeter remains a reliable ally. Performing a thorough test with a multimeter allows for direct measurement of voltage, polarity, and other crucial electrical parameters. This tried-and-true method provides a detailed insight into the outlet’s condition and suitability for powering devices.
Using the 30 Amp Receptacle
Whether in the comfort of a campsite or within the confines of your own yard, the consistent delivery of 110-125 volt single-phase AC power is paramount. This reliability guarantees the smooth operation of your RV’s electrical components, contributing to a worry-free experience.
The Vital Role of Voltmeters and Multimeters
To confirm the presence of the correct voltage range, the employment of voltmeters or multimeters is crucial. These instruments serve as your vigilant guardians, providing real-time insights into the outlet’s electrical output. By connecting the meter to the outlet and observing the displayed reading, you gain immediate assurance that the voltage falls within the specified range.
The Red Flag of Irregular Voltage
Should the voltage reading deviate from the expected 110-125 volt range, it’s a clear red flag. Operating appliances under these irregular conditions can lead to damage, inefficiency, or even hazards. As a responsible user, the correct course of action is to refrain from using the outlet until the voltage issue is addressed and rectified.
Safe Power Utilization
Safety considerations are paramount to prevent damage. Never plug or unplug the cord under load. All 120-volt appliances must be turned OFF before connecting to shore power, and the same applies to disconnecting. Here’s a safe step-by-step process for both connecting and disconnecting the RV:
Connecting Your RV:
- Turn off main breakers or breakers inside the RV;
- Plug in the cord;
- Turn the breaker ON.
Disconnecting Your RV:
- Turn off main breakers or breakers inside the RV;
- Disconnect the cord;
- Coil the cord and stow it away.
Conclusion
In the realm of establishing a 30-amp RV plug, mastery lies not just in the practical steps but in the meticulous attention to detail. This comprehensive guide has unveiled the intricacies of this process, emphasizing the careful selection of components and the importance of safety. By adhering to these guidelines, individuals can confidently create an RV outlet that caters to their recreational needs while prioritizing the well-being of themselves and their devices.
- From adjusting for temperature variations to meticulously wiring the outlet, the journey toward a fully functional 30-amp RV plug demands awareness, preparation, and methodical execution. Notably, the inclusion of temperature adjustments addresses a critical factor that can impact the efficiency and safety of the wiring. With the meticulous wiring steps outlined, one can seamlessly connect the various components, ensuring proper functionality and reliability;
- The journey does not end with installation; rather, it extends to rigorous testing and safe usage practices. Testing the outlet’s polarity and voltage ensures a secure foundation for powering devices. Additionally, understanding the significance of safe power utilization, from plugging in to disconnecting, shields appliances and individuals from potential harm.
In conclusion, the art of setting up a 30-amp RV plug encompasses not only technical skill but also a commitment to precision and safety. This guide empowers enthusiasts to create an environment that encourages enjoyable and worry-free RV experiences, all while embracing the principles of responsible electrical installation and usage.