Planning a journey in your RV? Ensuring you have the right power supply is crucial. This guide will walk you through the process of installing a 50 amp RV outlet to keep your vehicle charged and ready for your adventures. From choosing the right location to connecting the wires, we’ve got you covered.
Necessary Tools and Materials
Before diving into the installation process, gather these essential tools and materials:
- 50 Amp RV Outlet Kit;
- Wire Cutters and Strippers;
- Voltage Tester;
- Electrical Tape;
- PVC Conduit and Fittings;
- Circuit Breaker Box;
- Wire Nuts;
- Safety Gloves and Goggles.
Selecting the Location
Choosing the right spot for your RV outlet is crucial. Look for a location that offers easy access and is close to your RV’s parking spot. Ensure the area is clear of obstructions and away from potential hazards like water sources.
Steps to Install a 50 Amp RV Outlet
Step 1: Turn Off Power
Begin by turning off the power supply to the area where you plan to install the outlet. Safety is paramount throughout the installation process.
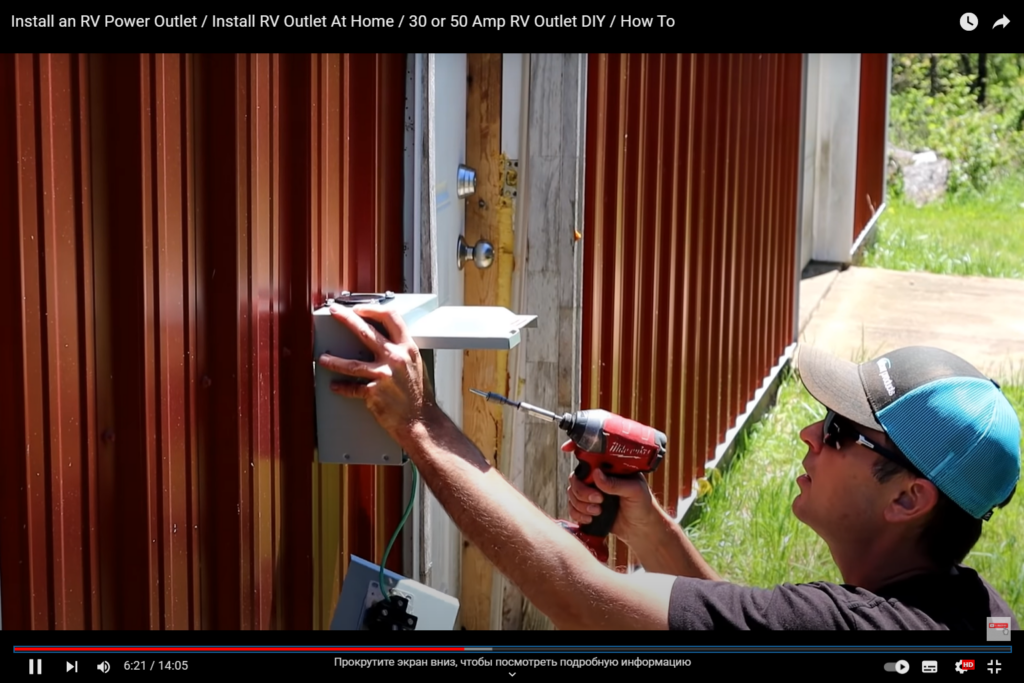
Step 2: Mount the Outlet Box
Mount the 50 amp RV outlet box on a suitable surface using screws and anchors. Make sure the box is properly secured and level.
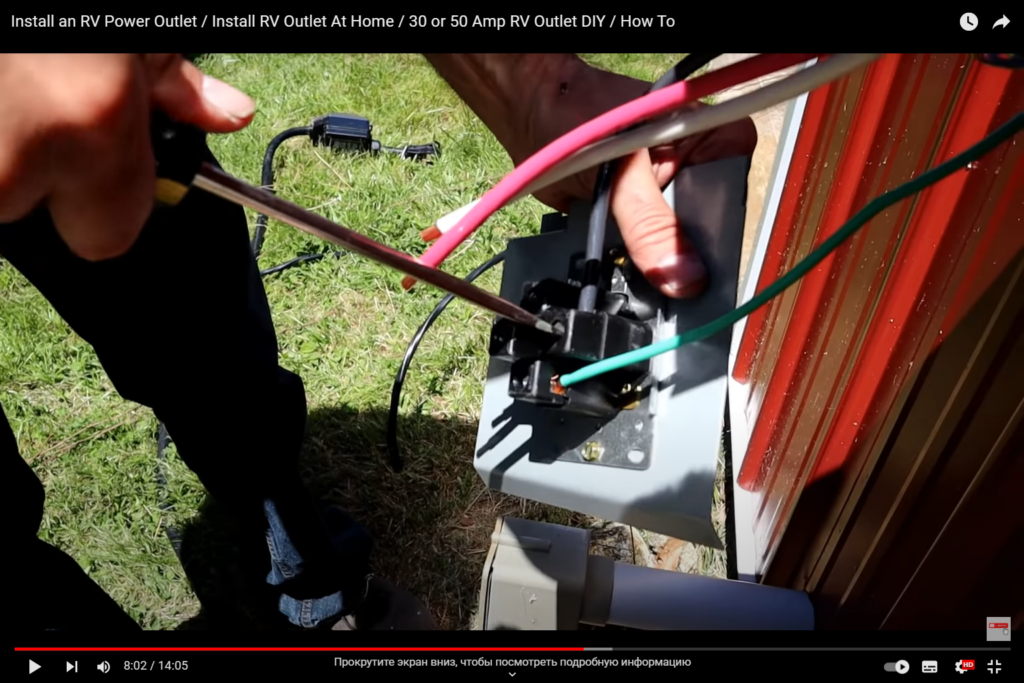
Step 3: Connect the Wires
Refer to the manufacturer’s instructions for wire connections. Generally, the outlet will have four wires: two hot wires (black and red), one neutral wire (white), and one ground wire (green or bare copper).
Step 4: Wire the Circuit Breaker
Install a double-pole 50 amp circuit breaker in your main electrical panel. Connect the hot wires to the breaker and the neutral wire to the neutral bus bar. Attach the ground wire to the grounding bar.
Step 5: Run Conduit
If required by local codes, run PVC conduit from the circuit breaker box to the RV outlet box. This protects the wires and ensures a clean installation.
Step 6: Complete Wiring
Inside the RV outlet box, connect the wires to the corresponding terminals. Secure them with wire nuts and wrap the connections with electrical tape for added protection.
Step 7: Test the Connection
Use a voltage tester to ensure that the power is off before testing the connection. Once confirmed, turn the power back on and test the outlet with your RV plugged in.
Comparison Table: 30 Amp vs. 50 Amp RV Outlets
| Aspect | 30 Amp Outlet | 50 Amp Outlet |
| Amperage Capacity | Up to 30 amps | Up to 50 amps |
| Suitable for | Smaller RVs and trailers | Larger RVs and motorhomes |
| Power Appliances | Basic appliances | Air conditioning, heaters |
| Wiring Configuration | 3 wires (hot, neutral, ground) | 4 wires (2 hot, neutral, ground) |
| Installation Difficulty | Easier | Moderately difficult |
Safety Precautions for RV Outlet Installation
When dealing with electrical installations, safety should be your top priority. Follow these precautions to ensure a secure and incident-free installation:
- Power Off: Turn off the main power supply to the area before starting any work. This prevents the risk of electric shock;
- Safety Gear: Wear safety gloves and goggles to protect yourself from potential hazards;
- Voltage Testing: Always use a voltage tester to confirm that the power is off before touching any wires;
- Proper Wiring: Make sure wires are properly insulated, and there’s no exposed wiring;
- Local Codes: Familiarize yourself with local electrical codes and regulations to ensure compliance.
Tools and Equipment Breakdown
Having the right tools at your disposal makes the installation process smoother. Here’s a detailed breakdown of the tools and equipment you’ll need:
- Wire Cutters: To cut wires to the required lengths;
- Wire Strippers: For removing the insulation from wire ends;
- Voltage Tester: To verify that wires are not carrying any current;
- Electrical Tape: To secure wire connections and prevent exposure;
- PVC Conduit and Fittings: For protecting wires in outdoor installations;
- Circuit Breaker Box: To provide overcurrent protection;
- Wire Nuts: To securely connect wires;
- Safety Gloves and Goggles: For personal protection.
Tips for Choosing the Right RV Outlet Location
Selecting the optimal location for your 50 amp RV outlet contributes to both convenience and safety. Consider these tips when choosing a spot:
- Proximity to RV: The outlet should be conveniently located near where you park your RV;
- Accessibility: Ensure easy access to the outlet without any obstacles;
- Distance from Hazards: Keep the outlet away from water sources and potential hazards;
- Elevation: Install the outlet at a higher elevation to prevent water accumulation;
- Weather Protection: If possible, choose a location with some form of weather protection.
Step-by-Step Guide to Wiring Connections
The wiring connections are a critical part of the installation process. Follow these steps carefully:
- Hot Wires: Connect the black and red wires to the corresponding terminals on the outlet. These are the hot wires that carry current;
- Neutral Wire: Attach the white wire, which is the neutral wire, to the designated terminal;
- Ground Wire: Connect the green or bare copper wire to the grounding terminal;
- Circuit Breaker Box: Install the double-pole 50 amp circuit breaker in your main electrical panel. Connect the hot wires to the breaker and the neutral wire to the neutral bus bar;
- Attach the ground wire to the grounding bar;
- Testing: Before closing everything up, use a voltage tester to ensure that the power is off. Once confirmed, turn the power back on and test the outlet with your RV plugged in.
Understanding RV Electrical Needs
Understanding your RV’s electrical requirements is essential for a successful installation. Different appliances and systems demand varying levels of power. Here’s a breakdown:
- Air Conditioning: Air conditioners are power-hungry appliances. A 50 amp outlet can handle the demand of an RV air conditioning unit more effectively;
- Heating Systems: Heating systems, especially in colder climates, can draw a significant amount of power. A 50 amp outlet ensures your RV stays warm and cozy;
- Kitchen Appliances: If you plan to use multiple kitchen appliances simultaneously, a 50 amp outlet provides the needed power for your microwave, refrigerator, and other gadgets;
- Entertainment Systems: TVs, sound systems, and other entertainment devices can contribute to your RV’s power consumption. A 50 amp outlet offers the capacity to handle these loads.
Troubleshooting Common Issues
Even with careful installation, issues might arise. Here are common problems and troubleshooting steps:
- No Power: If the outlet isn’t supplying power, check the circuit breaker and wiring connections. Also, ensure the RV’s main power switch is turned on;
- Tripped Breaker: If the circuit breaker trips frequently, your RV might be drawing more power than the outlet can handle. Limit appliance usage or consider upgrading to a higher amperage outlet;
- Inconsistent Power: If power supply is inconsistent, check for loose wiring connections or damaged wires;
- Overheating: If the outlet or wires become hot, it could indicate an overload. Reduce the load or consult an electrician to assess the wiring.
Benefits of a Professional Installation
While DIY installation is feasible, opting for a professional electrician offers several advantages:
- Safety: Electricians are trained to handle electrical work safely, minimizing the risk of accidents;
- Expertise: Electricians have the experience to ensure proper wiring and adherence to local codes;
- Efficiency: A professional installation is likely to be quicker and more efficient, minimizing downtime;
- Warranty: Some outlets and installations might come with warranties when done by a licensed electrician.
Regular Maintenance and Safety Checks
Once your 50 amp RV outlet is installed, regular maintenance ensures its longevity and safety:
- Inspect Wires: Regularly check for any frayed or damaged wires. Replace them immediately if you notice any issues;
- Weatherproofing: Ensure that the outlet and wires are adequately protected from the elements. Consider installing weatherproof covers;
- Routine Testing: Periodically test the outlet using a voltage tester to ensure it’s functioning correctly;
- Professional Check-ups: Every few years, consider hiring a professional electrician to inspect the outlet for any potential issues.
Conclusion
By following these steps, you can confidently install a 50 amp RV outlet and ensure a smooth and comfortable journey in your RV. Always prioritize safety and consider seeking professional help if you’re uncertain about any step.
FAQs About RV Outlet Installation
Yes, you can, but it’s essential to have a good understanding of electrical work and follow safety precautions.
You can install a lower amperage outlet if your RV’s power requirements are lower, but a 50 amp outlet offers more versatility.
Depending on your location and local regulations, you may need a permit. Check with your local authorities before starting.
Upgrading the outlet involves additional wiring and a new circuit breaker. It’s recommended to consult an electrician for such upgrades.
If you’re unsure about any step, it’s best to hire a licensed electrician to ensure a safe and correct installation.