Setting up an RV outlet at home doesn’t pose much complexity, thanks to the color-coded nature of wires and connections. The green (or bare) wire is directed to the green screw, the white wire to the silver screw, and the black (or red in a 50-amp plug) wire goes to the brass screw.
For individuals who own recreational vehicles, having an RV outlet at home offers the convenience of easy preparation for upcoming road trips and the flexibility to use the RV as guest lodging for friends and family visits.
Maintaining a continuous connection to power keeps the RV’s batteries charged and in good condition, while also simplifying maintenance and upgrades. Before delving into the process, it’s important to ascertain the type of RV electrical service in place.
RV Electrical Service Types
RVs or camper trailers are typically wired for one of two services:
- 30-amp service: Suitable for smaller motorhomes and trailers with a single roof air conditioner;
- 50-amp service: Designed for larger RVs with two roof air conditioners and full-size appliances.
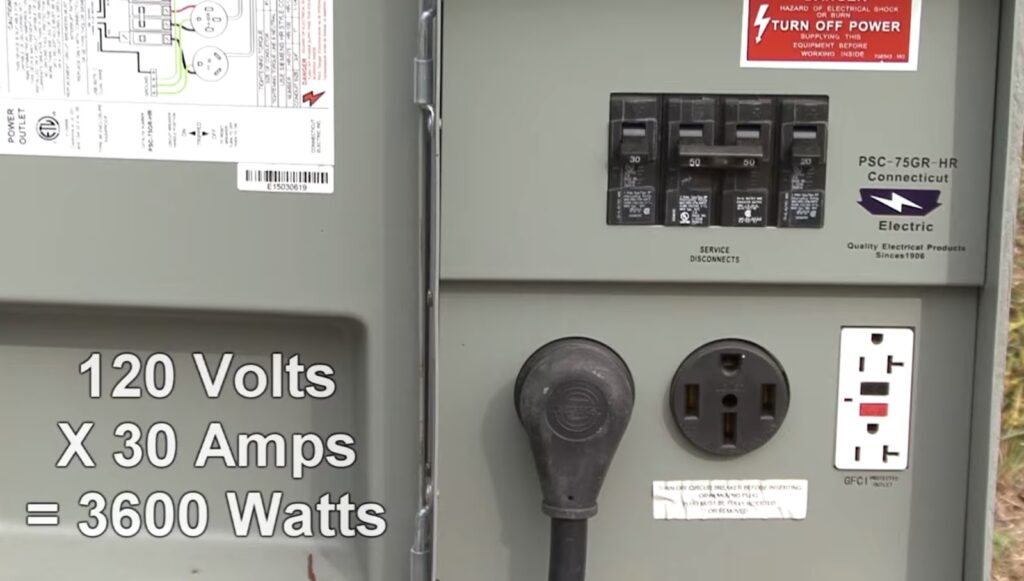
RV Plug Varieties
30-Amp Service:
The 30-amp service plug is a three-prong 120-volt male cable that offers 3,600 watts (120 volts x 30 amps).
50-Amp Service:
The 50-amp service plug is a four-prong 120/240-volt plug that features two 50-amp connections at 120 volts each, amounting to 12,000 watts in total.
Essential Components for Wiring RV Plug:
1. Outlet Selection
The inception of crafting your RV power oasis begins with a judicious selection. Opt for NEMA TT-30R for the 30-amp service, ensuring compatibility and seamless energy flow. Similarly, for the more robust 50-amp service, embrace NEMA 14-50R, a receptacle designed to handle the heightened energy demands with grace and efficiency.
2. Choosing the Right Electrical Box
A pivotal choice in your electrical symphony is the selection of the electrical box. Consider a weatherproof outdoor receptacle panel that welcomes the RV cord within, providing shelter and safeguarding against the elements. This choice embodies a marriage of function and foresight, ensuring your power source remains viable even amidst unpredictable weather conditions.
3. Breaker Arrangement
The heart of your power management system rests in the breaker selection. For the 30-amp service, introduce a single-pole 120V breaker, aligning with the service’s requirements. Meanwhile, the 50-amp service calls for the embrace of a double-pole 120/240-volt breaker, embodying the increased capacity with its dual presence.
4. Wiring Precision
The delicate dance of energy hinges on the choice of wires. Employ a minimum 10-gauge wire for the 30-amp service, ensuring a robust flow that meets the demands. As you venture into the realm of the 50-amp service, elevate your choice to a minimum 8-gauge wire, with the option of a recommended 6-gauge wire. This choice showcases the careful calibration of capacity and capability.
5. Envisioning the Ensemble
The creation of your power ecosystem extends beyond the core components. Equip yourself with a tapestry of additional accessories – a faceplate to encapsulate the essence of your outlet, conduit to guide and protect the flow, wire staples and cable clamps to maintain the order, and the symphony of wiring tools that facilitate the harmonious assembly of connections.
With each selection in this harmonious ensemble, you lay the foundation for a power symphony that orchestrates seamless energy flow, safeguarding your RV adventures while ensuring comfort and convenience at every turn.
Wiring Process
1. Disabling the Main Power
The initial step on this electrifying journey entails locating the main breaker and ensuring it’s turned off. This essential precaution sets the stage for a safe and seamless wiring process.
2. Breaker Integration
With safety at the forefront, the user proceeds to introduce a new breaker into an available slot within the breaker panel. This strategic installation primes the system for enhanced power management.
3. Incorporating Wiring
Guided by precision, the new wire finds its path into the circuit breaker panel. Delicate stripping of cord coverings follows, unveiling the essence of the wires that facilitate the flow of energy.
4. Ground and Neutral Connection
Embracing the principle of balance, the ground and neutral wires gracefully connect to their designated bus bars. This step resonates with the symphony of safety and reliability that underscores electrical systems.
5. Establishing Hot Wire Connection
The dance of wires continues as they’re artfully integrated into their appropriate domains. For the 30-amp service, a single black hot wire takes center stage. In contrast, the 50-amp service calls for a graceful pairing of two black hot wires, harmonizing the power flow with finesse.
6. Conducting Final Checks
Prior to the curtain call, meticulous attention is devoted to each connection. A gentle tug test serves as the litmus test for stability, ensuring that every connection holds steadfastly in place, ready to carry the current of your adventures.
7. Reinstating the Cover and Labeling
As the final touches are imparted, the breaker panel cover is securely reinstated, enshrouding the intricate symphony of wires within. The label of the newly installed breaker adds the finishing touch, demystifying the system for future reference.
Through this meticulous choreography of steps, the user transforms a space into a haven of power, where wires and connections fuse to create a harmony that fuels the voyage of the recreational vehicle. Remember, electrical work demands caution, and if uncertain, it’s wise to seek professional assistance.
Outlet-side Installation
In the subsequent steps, the user approaches the installation process from the outlet side:
- Step 1: Loosen the fasteners securing the outlet in place;
- Step 2: Align the color-coded wires with their corresponding screw terminals. The wiring procedure differs for the two service types:
In the realm of 30-amp service, the corresponding backside wiring diagram unfolds as follows:
- The intricacies of the wiring process reveal a thoughtful orchestration of connections. The green (or bare) wire, a harbinger of grounding, finds its designated place with the green screw. The white wire, the emissary of neutrality, elegantly aligns itself with the silver screw. Meanwhile, the black wire (or the red counterpart in the case of a 50-amp plug) gracefully claims its spot with the brass screw.
On the frontier of 50-amp service, an invaluable backside wiring diagram awaits your exploration:
- Here, the dance of wires assumes an even grander scale. The vibrant dance partners remain the same: the green (or bare) wire, the white wire, and the black (or red) wire. Each finds its home with a particular screw terminal, ushering in a symphony of connections that harmonize to deliver the power needed for your RV adventures.
Important Alert! Anyone following these instructions takes full responsibility for any outcomes. Non-professionals are cautioned against attempting these procedures.
Verifying Your Service
Before engaging any connections, a preliminary assessment is prudent. This applies to both professionally-installed systems and those in use for the first time at an RV park. Testing with a voltmeter or surge protector is advisable.
For 30-amp Service:
The process of verifying your 30-amp service, through voltmeter readings, offers a glimpse into the intricate dance of currents that power your RV. These readings, acting as a litmus test, provide a crucial assessment of the electrical health of your setup, ensuring both safety and efficiency.
- Between the HOT and GROUND wires, the voltmeter should register a steady reading of approximately 120 volts. This measurement speaks to the stable connection between your power source and the grounding element, an indispensable facet of safe electrical systems;
- In parallel, the voltmeter reading between the HOT and NEUTRAL wires mirrors the previous measurement, once again hovering around 120 volts. This reading underscores the balanced interplay between the active current and its neutral counterpart, creating a harmonious equilibrium in the electrical flow;
- With precision and scrutiny, the voltmeter gauges the interval between the NEUTRAL and GROUND wires. In a well-calibrated system, this reading should ideally range between 0 to 2 volts. This negligible voltage spread is a testament to the delicate balance that ensures the safety and integrity of your circuit.
By meticulously interpreting and embracing these readings, RV enthusiasts ensure a power setup that’s poised for a seamless journey. The symphony of voltages reveals the health of connections, promising smooth travels and worry-free adventures on the open road.
For 50-amp Service:
Voltmeter tests offer a window into the dynamic interplay of electrical currents within your RV outlet, bringing an empirical dimension to your electrical setup. These tests, vital for both safety and functionality, provide essential insights into the health and integrity of your power source.
For 50-amp service, the voltmeter unveils a spectrum of readings that illuminate the state of your connection:
- The span between the two HOT wires should ideally settle around 240 volts. This dual current flow is emblematic of the robust energy supply at your disposal;
- Between the HOT and NEUTRAL wires, the voltmeter hovers around 120 volts, underscoring the essence of balance and equilibrium in your electrical circuit;
- Similarly, the space between the HOT and GROUND wires also hovers at 120 volts, highlighting the harmonious engagement between your power source and the earth;
- With meticulous precision, the voltmeter gauges the interval between NEUTRAL and GROUND wires, resting within the range of 0 to 2 volts. This slim margin underscores the necessity for equilibrium, safeguarding your system from potential imbalances.
These readings, resembling a symphony of measurements, reveal the intricate dance of energy within your RV outlet. Armed with this empirical understanding, you’re empowered to ensure the optimal functioning of your RV’s electrical ecosystem, fostering both safety and reliability as you embark on your journeys
Utilizing Your Service
Manufacturers commonly offer recommendations for proper utilization of your RV power cord:
- Deactivate all appliances in the RV;
- Switch OFF the service breaker (or the RV’s internal breaker if available);
- Plug in the cord;
- Re-activate breakers (main or RV).
A Crucial Reminder! Never connect your cord while under load.
For 30-amp Service:
Given the limitations of 30-amp service, strategic appliance usage is essential. A running converter consumes energy, so device selection is critical. As the breaker triggers at 80% of full load, factor this into calculations.
- A Handy Formula: Convert watts to amps using the formula: watts / volts = amps. For instance, a 400-watt device at 120 volts draws 3.333 amps.
By exercising prudence in device activation and adhering to calculated load capacities, RV enthusiasts ensure a hassle-free experience while utilizing their power service.
Conclusion
In the voyage of understanding the intricacies of wiring an RV outlet, one embarks on a journey that blends technical precision with practical utility. As the exploration of both 30-amp and 50-amp services unfolds, it becomes evident that the art of wiring is not merely a mechanical endeavor, but a delicate orchestration of colors and connections that fuel the heart of recreational vehicles.
- The 30-amp service, with its defined limitations, requires a careful dance of device selection. The wires, imbued with purpose, find their designated screws with an almost poetic elegance. Understanding the interplay between devices, breaker capacity, and load provides enthusiasts with the key to harmonious power consumption;
- Venturing into the realm of 50-amp service, the scale of connections expands, mirroring the potential it bestows. Here, the wiring diagram is not merely a map of connections; it is a gateway to harnessing a more robust power stream. The nuances of grounding, neutrality, and the dynamic dance of wires take center stage, promising an abundance of energy for larger RVs and more power-hungry appliances.
In conclusion, the journey through RV outlet wiring serves as a microcosm of the broader exploration of recreational vehicle living. From meticulous color-coded connections to the careful calculation of load capacity, each step reflects the seamless integration of technical expertise and practical application. With every circuit completed and breaker activated, the RV comes to life, ready to accompany adventurers on their explorations, all while the symphony of wiring remains hidden behind the scenes, a testament to the precision that powers the journey.